
I have often heard complaints from artists who say their acrylic paints dry out too fast on the palette and they waste a lot of paint because of it. Of course, this would be more of an issue in hotter climates so I thought I would share pics of how I make my own wet palette for use with acrylic paints. I LOVE working with wet palettes as I can leave my paint in the container for at least a week and the paint remain workable. I usually make up several palettes at once because when I'm on a roll, I'm on a roll. lol
SUPPLIES NEEDED -
Some examples of suitable containers below.
Make sure they have lids so they can be sealed
when not in use.
Make sure they have lids so they can be sealed
when not in use.

Flat Kitchen Sponge
These measure about 17cm x 21cm
equivalent is approx. 7" x 8"

Greaseproof Paper (NOT the waxed kind)
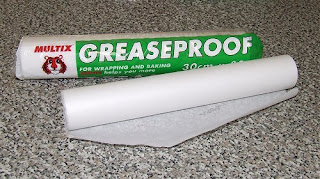
TO ASSEMBLE PALETTE -
Wet the kitchen sponge and wring out excess water leaving sponge damp. If it's very hot weather, I will leave a little more water in the sponge than just damp. Wrap damp sponge in TWO sheets of greaseproof paper.

It's very important to use two sheets of greaseproof paper as only one sheet will result in your acrylic paints being a runny mess within 24 hours. I have found that the puddles of paint hold their shape perfectly with two sheets of the paper.


Here is one of the palettes in use. After a painting session, or if you get called away to the phone, simply pop the lid onto the container to avoid the palette and paint drying out. As previously stated, these palettes (and paint puddles) will remain workable for up to week or a bit longer depending on climate.

Click on images to enlarge
Some artists like to keep their wet palettes in the fridge but I have found this causes beads of water and a lot of condensation to build up inside the container so I prefer to just leave my palettes sitting at the ready in my studio. There are no big messes to clean up as, after I have finished with the palette, I just toss the paint-covered paper into the rubbish bin. I then rinse out the sponge in fresh water, re-wrap in fresh paper and place back in the container ready for the next use. Easy peasy ~ :)
Is this "bricomania"?
ReplyDeleteVery good advice.
Kisses Serena.
ahh Serena thankyou so much for this.. i actually tried this a couple of times but i got confused as to where to put the paint .for some reason i kept thinking it just had to sit in the container.... lol .. i cant believe that now it all makes sense :)
ReplyDeleteSorry, Jou Mike, I tried to google Bricomania and couldn't grasp an understanding of what it means? I hope you found it helpful.
ReplyDeleteThanks, Belinda. It can be confusing to those who have never used wet palettes before and pics definitely help. I will try to get a pic of my working palette though be prepared for a mess. LOL
Thanks for this Serena...but, I'm wondering about the bag that the wrapped sponge goes in...do you leave it open? Do you put your paints directly on the wrapped sponge and then seal it in the bag? And then seal the plastic container? Paulette Insall was talking about this type of palette in our last class but she didn't actually show it to us so I was left with lots of questions...your timing is perfect!
ReplyDeleteThanks, Kate. Sorry for the confusion. There are actually two palette containers showing in the pics...one is a clear, hard plastic square container that used to be a Ferrero Rocher Chocolate box (yum!) and the other is a cheap version of Tupperware with a green lid. I showed two containers so people see that they can use various containers as long as they have a lid. The flat kitchen sponges usually come three to five in plastic packet...so you will use one sponge, dampened and wrapped in two sheets of the paper, and then placed inside the sealable container. No plastic bags are involved. When the palette is not in use, be sure to seal it shut with the lid otherwise the palette and paint will dry out. I will add a couple of extra pics to the post shortly for you. Please feel free to ask me more questions if I haven't explained it properly as I'm only too happy to help.
ReplyDeleteThis is great Serena. I haven't tried these before, only heard about them briefly at a workshop last year. I'm going to try it on my next paiting. Thanks for the step by step guide & pictures!
ReplyDeleteMaria
xoxo
Thanks Serena! All is now clear to me! I really appreciate this tutorial.
ReplyDeleteI obviously need to eat more chocolates so I know the difference between a plastic bag and a Ferrero Rocher container...lol!
Glad the tutorial was of help, Maria. I find the wet palette an invaluable tool.
ReplyDeleteLOL My fault entirely, Kate. I realised I had confused you by showing two different containers in the pics while my words were in terms of one palette so you obviously thought they were connected in some way. I have since altered my wording and added extra pics to clarify. I'm glad you found the tutorial useful. :)
This is great and just what I need to be doing. Thanks
ReplyDeleteI had learned this technique in my tole painting classes, but haven't painted in a year at least, so forgot about it...I'm glad you refreshed my memory, or this particular thing probably would have gone by the wayside!!! I can see how it would be mandatory with the large scale paintings you do!!!
ReplyDeleteI was reading your tips most attentively until I saw the Ferrero Rocher label. And, then I cannot stop thinking about chocolate! ;)
ReplyDeleteThanks, Sharon and Julie ~ :)
ReplyDeleteLuci, you are too funny! lol
I tried this out last night Serena and posted it on my blog. It worked a treat !!!
ReplyDeleteI'm really impressed with this- I had quite a few struggles with keeping acrylic palettes. Sponges, parchment...my puddles always got runny. Or they dried out completely. I'm not sure what greaseproof paper is but I'm sure we have it here by another name.
ReplyDeleteIf I ever get back into acrylics (love my oils!) I'll be checking back to this post.
Serena, thank you so much for sharing this with us. I was searching the web for "wet palette" then came your page. God bless you and give you plenty of joy. Bye, Bolivar/.
ReplyDeleteI'm glad to hear you liked working with the palette, Belinda. :)
ReplyDeleteJessica, greaseproof paper is basically a lunchwrap that is not waxed. I think baking paper would work just as well. I hope you find it useful should you try acrylics again. :)
Bolivar Chagas, you are more than welcome. :)
Thanks so much for this tutorial. I'm going to definitely try it out. Then if my son calls again I won't ruin all my paints!
ReplyDeleteYou're very welcome, Janet ~ :)
ReplyDeleteI just discovered this tutorial. What a great idea! and so easy. I will definitely try this.
ReplyDeleteThanks, Serena!
serena,
ReplyDeletethis is so nice with the pictures...much easier to understand...do you think parchment paper would work as well as what you are describing? I am not familiar with that....
thank you for taking the time to explain this so well...do you have a place you get those large flat sponges?
also, many thanks for your comments on my blog...they mean the world to me.
blessings...
Hi Serena
ReplyDeletejust googled wet palette and found your very welcome and helpful tut.I have all the things needed and shall make myself one asap.I live in the Northern Territory and I'm doing an on line class on drawing and painting faces on canvas...the darn hot weather here was drying the Golden's out before I even finished mixing colours.Thankyou thankyou thankyou
Annette Husband
Nice informative post. I will have to try this. I have some purchased ones and never have room in my ref.
ReplyDeleteFabulous! This is so handy - I'm definitely going to try this. Thank you!
ReplyDeleteThanks Serena. This works! We are in a heat wave at present and this is a god-send!
ReplyDeleteThanks, everyone. I'm thrilled that you have found my wet palette tutorial so useful. I know I could not get by without mine as our summers are long and harsh. :)
ReplyDelete